
Showing posts with label Photoshop. Show all posts
Showing posts with label Photoshop. Show all posts
Friday, June 10, 2011
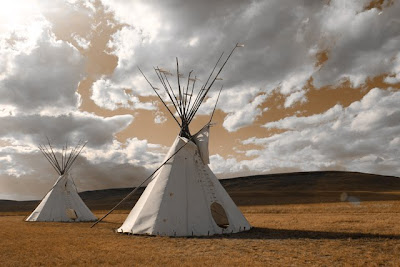
Pete, Re-pete... Hey, wait a minute
Never believe what you see. All the elements are real - they just didn't happen all at the same time.

Tuesday, June 15, 2010

Monday, March 08, 2010

Monday, February 22, 2010


Photoshop Exercise # 4 - Fixing Perspective


- Open your photo in Photoshop
- Duplicate the Background layer by clicking Layer > Duplicate Layer
- Create a grid for aligning your image
- On the full version of Photoshop, click View > Show > Grid
- On Elements, Create a new layer (Layer > New Layer)
Choose your Brush Tool
Hold down the shift key and drag a horizontal line; release the mouse
Click your mouse and then hold down the shift key and drag a horizontal line; repeat in horizontal and vertical stripes until you have enough of a grid to align your image.
- Make sure “Background Copy” is your active layer
- Begin Transforming:
- In the full version of Photoshop, Click Edit > Free Transform
- In Elements, Click Image > Transform > Free Transform
- Move your cursor off one of your corners and rotate the image until one edge is vertical (your image may work better if the straight edge is horizontal)
- In our example, the door has a perspective problem.
Right Click (Ctrl Click in mac) and choose Perspective.
Drag the upper right corner straight up so that the top edge of the door is parallel to one of your horizontal guides.
- In our example, this does not resolve all the perspective issues.
Place your cursor in the middle of the right edge and drag down until you have an equal amount of perspective distortion at the top and bottom.
- Drag the upper right corner straight up so that the top edge of the door is parallel to one of your horizontal guides.
- Repeat steps 8 and 9 until the perspective tool has done all that it can
- Right Click (Ctrl Click in mac) and choose scale (or free transform)
Drag the right edge out until the panel nearly fills the space.
- Right Click (Ctrl Click in mac) and choose distort
Pull on the right hand corners until they are perfectly square.
- Hit the enter/return key to finish the transformation.
- Turn off your grid
- On the full version of Photoshop, click View > Show > Grid
- On Elements, make your grid layer your active layer and delete it.
- If you are finished with your image, flatten your image by clicking Layer > Flatten image.
- Save your work
Saturday, February 20, 2010
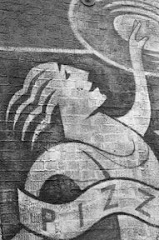
Exercise #3 - combining images using clipping paths


Note: In the full version of Photoshop, we can use layer masks to isolate a subject; In Photoshop Elements, there is no layer mask function for image layers, so we’ll be achieving the same effect using a Clipping Path.
- Choose two images and open both in Photoshop. One of these layers will be the background layer and the other will sit above. You may need to experiment to figure out which image works best as a background image.
In our example, the skateboarder will be the background image. - Make your background (skateboarder) image the active image.
- Create a new blank layer by clicking Layer > New > Layer
- Click Window > Swatches
- Click on one of the vivid colors in the swatch panel (preferably one which is not in your image)
- Take your rectangular marquee tool and draw a rectangle around the part of the image you wish to keep.
- Click Select > Inverse to outline everything except your rectangular area.
- Click Edit > Fill; fill with your foreground color at 100%
Your canvas should be filled with the vivid color you chose in step 5. - Click Select > Deselect to make your outline disappear.
- Use your polygon lasso, magnetic lasso, magic wand or quick select tool (newer versions of Photoshop & Elements) to begin outlining small portions around your subject.
- Click Edit > Fill; fill with your foreground color at 100%
- Repeat steps 10 and 11 until your subject is completely surrounded by your vivid color.
- If you make an error, use your eraser tool to remove excess color. Re-outline your subject and fill again.
- Make your other image the active image. In this example, it is the graffiti.
- Click Edit > Select All
- Click Edit > Copy
- Make your background image the active image
with the vivid color layer as the active layer. - Click Edit > Paste
Your graffiti image should now cover the background image and vivid layer. - Save your work.
- Create a clipping mask
- In Photoshop CS2 or newer, Click Layer > Create Clipping Mask
- In older versions of Photoshop, Click Layer > Group with previous
- In Photoshop Elements 8, Click Layer > Create Clipping Mask
- In earlier versions of Elements, Click Layer > Group with Previous
- Save your work.
- (Optional) Use your move tool to move your topmost layer to a desirable position.
- (Optional) Crop your image
- Save your work.
Friday, February 19, 2010
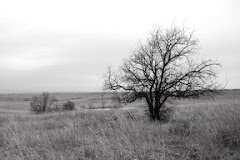
Photoshop Exercise # 2 – Creating an “old time image” with blurred edges
Edited Image
 Original Image

 Original Image
- Open your photo in Photoshop
- Duplicate the background layer by clicking Layer > Duplicate Layer.
- Blur your duplicate layer using the Gaussian Blur filter
- Click Filter > Blur > Gaussian Blur
- Set your blur to somewhere between 10 and 30 pixels – your image should look pretty blurry. Click OK.
- Use your elliptical marquee tool to draw an oval around the part of the image you would like to keep sharp.
- Feather the edges of your selection
On newer versions of Photoshop, click Select > Refine Edge
On older versions of Photoshop, click Select > Feather
Set your Feather Radius to a soft amount between 30 and 50 pixels. - Cut out your elliptical selection by clicking Edit > Cut
- Create a Hue/Saturation Layer by clicking Layer > New Adjustment Layer >
- Reduce your saturation to -40 or -50%
- Save your work as a psd or tiff to keep the layers
- If you are finished with your image, flatten your image by clicking Layer > Flatten image.
- Resave your work as a jpeg for sharing
Photoshop Exercise # 1 – Colorizing an image
Colorized image

Original Image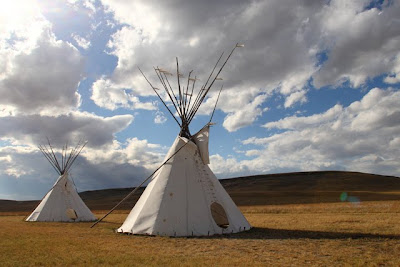

- Open your photo in Photoshop
- Click Window > Swatches
- Click on one of the colors in the swatch panel
- Click Layer > New Fill Layer > Solid Color
- Change the made from normal to color and click OK
- Adjust your color to a desirable color in the color picker and click OK
- If you are finished with your colorizing, flatten your image by clicking Layer > Flatten image.
Thursday, December 31, 2009


Saturday, May 16, 2009


Saturday, May 02, 2009
Images from Blending Mode Handout
Two images combined using the "lighten" blending mode. Blurred image is the blend image.  Color image toned using a brownish "Hue" blending layer over the image of the Geese
  Pattern Fill Layer Blended with a color photo using the "Overlay" blending mode
 Image using two identical layers, the colored pencil filter and the "overlay" blending mode

 Color image toned using a brownish "Hue" blending layer over the image of the Geese
  Pattern Fill Layer Blended with a color photo using the "Overlay" blending mode
 Image using two identical layers, the colored pencil filter and the "overlay" blending mode
Tuesday, March 04, 2008
Carolyn's Purple Tulips
Carolyn ran into one of the dilemma's we photographer's often face. While shooting indoors without a flash, her image came out amber colored. This is a sure sign the image was taken with either AWB (auto white balance) or one of the outdoor white balance settings, like daylight, cloudy or shade.
To correct this amber color cast while shooting, one could:
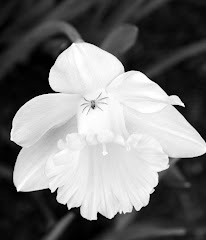
b..jpg) I am often asked if you can color correct an image. The answer is "sort of". Below is Carolyn's image corrected, as well as the corrected version of Alexa's tungsten image. In both cases, it was possible to neutralize the shadow (black) and highlight (white) parts of the image. In both cases, this resulted in a few odd color casts in other parts of the image. In Carolyn's image, the bowl became knock-your-socks-off blue and had to be cut back using the saturation tool. With Alexa's image, the brightest parts of the daffodils got bluish highlights as well.
I am often asked if you can color correct an image. The answer is "sort of". Below is Carolyn's image corrected, as well as the corrected version of Alexa's tungsten image. In both cases, it was possible to neutralize the shadow (black) and highlight (white) parts of the image. In both cases, this resulted in a few odd color casts in other parts of the image. In Carolyn's image, the bowl became knock-your-socks-off blue and had to be cut back using the saturation tool. With Alexa's image, the brightest parts of the daffodils got bluish highlights as well.
The moral?? Try to set your white balance for your light source while you are shooting. It is much easier and less frustrating than trying to correct after the fact.


To correct this amber color cast while shooting, one could:
- use a flash. however, this would result in an image without the nifty shadows and highlights; the moodiness of the image would be less.
- set the white balance (WB) button to an indoor light setting, such as tungsten or fluorescent.
b..jpg) I am often asked if you can color correct an image. The answer is "sort of". Below is Carolyn's image corrected, as well as the corrected version of Alexa's tungsten image. In both cases, it was possible to neutralize the shadow (black) and highlight (white) parts of the image. In both cases, this resulted in a few odd color casts in other parts of the image. In Carolyn's image, the bowl became knock-your-socks-off blue and had to be cut back using the saturation tool. With Alexa's image, the brightest parts of the daffodils got bluish highlights as well.
I am often asked if you can color correct an image. The answer is "sort of". Below is Carolyn's image corrected, as well as the corrected version of Alexa's tungsten image. In both cases, it was possible to neutralize the shadow (black) and highlight (white) parts of the image. In both cases, this resulted in a few odd color casts in other parts of the image. In Carolyn's image, the bowl became knock-your-socks-off blue and had to be cut back using the saturation tool. With Alexa's image, the brightest parts of the daffodils got bluish highlights as well.The moral?? Try to set your white balance for your light source while you are shooting. It is much easier and less frustrating than trying to correct after the fact.
Subscribe to:
Comments (Atom)

e+b.jpg)
b..jpg)